
Furniture paint is the hottest trend in recent years. With its supple texture and seductive colours, clay paint transforms ordinary items like thrift store furniture into eye-catching art pieces.
Because of it’s versatility, clay paint is a joy to work with and helps to revive old items or make new ones look fabulously old. Clay paint behaves differently from conventional paint since it has a mineral content that places it closer to lime wash than to latex paints. With an extremely fast drying time and the option of a final wax finish, clay paint tends to operate under its own set of rules.
Here are few clay painting techniques, which can transform your piece, be it a furniture or Craft into something unique.
Smooth Finish
To get the perfect smooth finish with clay paint, apply it using a short handle brush with angled bristles (My recommendation is Wooster short handled brush with slanted bristles). For the first coat, it does not matter how you apply, but the final coat needs to be in the same direction.
It is very important to make sure your paint is not too thick when you apply your second coat. The best way to ensure that paint is evenly distributed, spray/mist your piece with plain water.
The next important step is to sand the entire piece. Let the paint dry and go over the entire piece with 400 grit sandpaper before applying wax/top coat. Once sanding is complete, wipe it with damp-dried lint free cloth. Than apply your top coat / wax. You will get a flawless smooth finish.
Blending Colours
Blending is a fun technique to apply two or more different colours on a same piece to give it an interesting look.
If you’ve never blended clay paint before don’t worry. It’s much easier than it seems and very hard to mess up! Work in small sections so you can blend while the paint is wet. The key here is keeping your paint wet, while blending it. Use different brush for each colour, and one brush for blending.
First coat will be just laying the paint. Second, coat is where we will start blending. Water is very important in helping the colours blend. Mist your flat head clay paint brush with water. Start blending where the two colours meet. Blend in long light strokes (along the line where 2 colours meet) moving up into one colour and then down to the other colour. Mist the paint with water if it gets too dry to blend.
Once you are satisfied with the blending, let it dry. Then sand it very lightly with 220 grit to prepare for the final coat.
At this stage you can apply the lighter colour and blend it with the darker, if you wanted a smooth blended look where you’re not able to tell where one colour starts and the other ends. Or you can leave the way it is for more defined look.
More about blending clay paint “Blending & Layering Clay Paint – Tips, Tricks & Techniques“
Layering Colours
Layering Clay Paint is a fun and easy way to give your furniture pieces some added depth, dimension and interest. There are multiple ways to layer clay paint.
Start With your darkest clay paint colour, when layering.
My first layer of clay paint goes on very light. Apply this colour where you want the colour to see through the layer of 2nd colour. If your piece has crevices, that is the best place to start with the first layer. Your goal for this 1st step is NOT to have full coverage.
Now it the time to apply the second clay paint colour layer. Use a different paintbrush and give your piece a light to medium coat of 2nd colour (being careful not to rub your brush too heavy over the 1st colour, because your goal is to show that colour).
Once I have the coverage I want with the 2nd colour. Then, go back to your first (darker) colour and just barely dip it into the paint. Really, just barely enough to dampen the ends of the bristles. Apply it on the crevices, to add a few additional highlights to the piece. Do not apply a lot of pressure with your brush. Your goal is for light, long sweeping motions across the lines/crevices. The lighter the strokes, the more blended your layering will look.
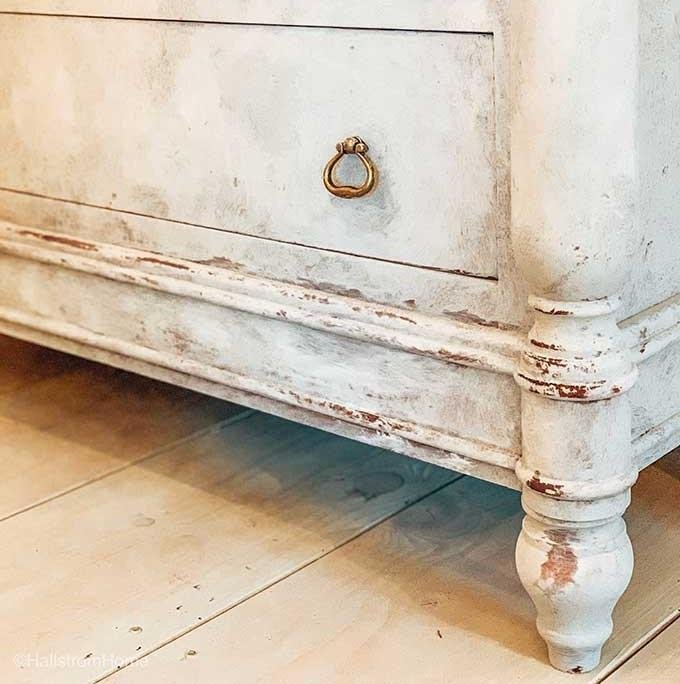
Distressed Finish
There are many ways to distress, one colour distressing, 2 or more colour distressing, wet distressing. Here we will be discussing the dry distressing.
Once colour distressing is very simple and easy. Apply two coats of one colour on your piece. Take 150 or 220 grit sand paper and sand the edges. This will make the underneath wood peak through giving it a distressed look.
In two layered distressing, first apply the two coats of the first colour, usually the darker goes first. Only paint the accent colour where you intend to distress. Depending on how heavy you distress, you may want more than two coats of your accent colour so you don’t cut right through to the wood. Next, I painted two coats of 2nd colour, all over.
Now, is the time to distress with 150 / 220 grit sanding block. I really like using the 3M blocks with the edges. They are easy to grip onto and work well to get into the tight spots/edges when distressing. Sand the area where you have applied the first colour until your are able to reveal the colour underneath.
Once you have achieved the look you are after, wipe the dust with damp-dried lint free cloth. Seal it with your favourite sealer.
Some “Do’s and Don’ts when Painting with Clay Paint“
Running Paint
Running paint is the easiest technique to get organic look on your piece, which will create coloured veins.
Apply different colours with medium loaded brush on the piece, and spritz it with water and let is run on the surface. Make sure that the piece is in upright position, so gravity will get to work. It will run the colours down and create veins.
If you surface is prepared with some textured material like Texture Wizard, you will get a better result, as peaks and valleys of the surface will guide the colour stream in an organic way.
Paint Wash
First paint your piece with base colour. After applying two coats, let it fully dry overnight.
For colour wash, mix 1-part paint to 2-parts water. You can always add a little more water if you feel you need to, depending on the look you’re going for. The more watered down the paint is the easier it will be to wipe off and the lighter and more sheer it will be.
Lightly dipped your brush in the wash and began brushing. Once applied the wash, immediately take a rag and wipe it off in the direction in which, you have applied the paint.
You’ll want to make sure to do one section at a time since the paint dries fast.
After all the excess paint was wiped off, if I felt like the rag hadn’t wiped it well enough or to your liking, simply spray the section with water, and wipe it again, this time with sponge. Damp sponge is way better this time, than the rag.
Cross-hatching
Cross-hatching create a faux linen effect.
When creating this look with clay paint, first apply thick layer of clay paint in the colour of your choice in only one direction to create lines. Let is dry completely, than follow on top with opposite direction brush strokes.
Cross-hatching adds a second layer of brush strokes that are drawn in the opposite direction. The second layer is applied at right angles to the first.
You can used two different colours, to create more dramatic effect in cross-hatching.
Stippling / Dabbing Paint
To create low peaks and valleys, lay down the paint thickly in a small area and follow by dabbing with the bristles. More like a stippling movement.
When using lint free cloth to get stippling/dabbing effect, the paint need to be thinned a bit. This will get you more spread out look. This look will look perfect when two colours shades are used, which are close to each other.
The key to this technique is applying in small sections, when dabbing or pouncing your paint brush onto the furniture. This clay paint technique does take longer than brushing on, but it’s worth it to get this old world Swedish look called Hygge home.
Again apply this clay paint like you do your first layer (may be of a different shade of same colour). Make sure you’re working in small sections so you can get the blending to come out nicely. Sanding with this Swedish clay paint technique is not recommended.
Here you can learn more about how to clay paint a furniture piece “Steps to clay paint your furniture pieces”
Dry-Brushing
When the piece has an existing lower colour that you would like to blend with an upper colour, use the dry-brush technique. Touch the tips of the bristles into the clay paint. Remove from the paint and hold the brush away from the work piece for a few seconds to allow the clay paint to reach a drier consistency on the brush. Then firmly brush over the work surface. Since the clay paint is fairly dry, it is virtually impossible to ruin the lower level with too much paint.
Featured Image: Courtesy www.diypaint.co